This article has been updated to reflect the enhancements that will be available after Friday 24 July as part of the July 2026 Release.
The marking tool brings together the processes of providing comments, feedback and entering marks and, reviewing and submitting a final grade. When using the marking tool, it is not necessary to go to the marking overview to finalise and submit the final grades. However, the marking overview is still part of the assessing landing page and you can read our corresponding article on using the marking overview tool.
In this article:
- Marking Tool Layout
- The Marking Archive
Marking Tool Layout
FLOWassign/FLOWhandin/FLOWlock

*Not all file types can be viewed directly in WISEflow. File types that can be viewed include: PDF, DOC, DOCX, XLS, XLSX, PPT, PPTX, JPG, PNG, JFIF
With multiple functions available, we shall take each section of the tool in turn. Please note that the screen views may differ according to how flows have been set up.
Left-hand Navigation Pane
Participants
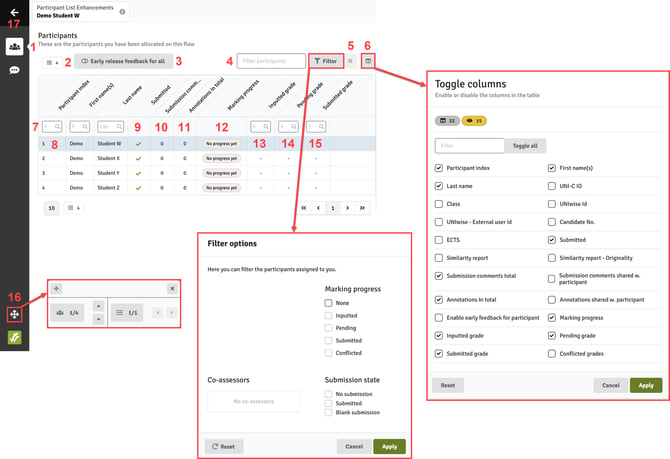
- Open the list of participants
- Number of participants listed
- Apply Early release feedback for all to all participants, if enabled on the flow (this setting can be enabled/disabled individually within the grading window)
- Filter the list of participants by selecting a criteria from the pop-up window
- Remove the filter
- Select the columns you wish to be visible in the table of participants
- Filter the list using any of the column headers
- Go directly to a participant's submission by clicking on the row in the table
- Identifies participants that have made a submission
- Total number of submission comments added
- Total number of annotations added
- Displays the marking progress status for each participant
- Identifies participants for whom you have inputted a grade
- Identifies participants for whom you have entered a grade but it is still pending e.g. requires marker agreement or reviewer approval
- Identifies participants for whom a final grade has been submitted
- Opens the navigation bar allowing you to move between participants or between files submitted by the same participant
- Takes you back out of the marking tool
Common Feedback
Common feedback can be added by opening the common feedback window by clicking on the ![]() icon. Please see our article on providing feedback.
icon. Please see our article on providing feedback.
Header Bar and Navigation Bar

- Flow name and current student name (when not anonymised)
- Open options menu to select download, print and settings functions
- Full screen view
- Navigate between multiple pages within the current file
- Select options for displaying transition between pages, page orientation (option to rotate pages) and page layout (single or double pages displayed)
- Select preferred magnification
- Zoom in and out
- Pan around e.g. when an image is highly magnified
- Select text
- View the current page
- Annotate utilising the tools listed in No. 14
- Annotate utilising shapes that show beneath: freehand, free hand highlight, rectangle, ellipse, polygon, line, polyline and arrow and select a colour: red, blue, black or green
- Insert a signature, rubber stamp, or a date
- Annotation tools: highlight, underline, strikeout, squiggly (underline), note and free text
- Undo last action
- Redo last action
- Eraser
- Displays word and character count of the highlighted text
- Displays word and character count of the submission
- Search for text within the current file
- Show all annotations in the right-hand pane; can be re-ordered according to preference
- Move the navigation bar to your preferred location on the screen
- Close the navigation bar
- Indicates which participant (index number) submission you are currently viewing
- Navigate up and down through the list of participants
- Navigate left and right through the files submitted by the current participant
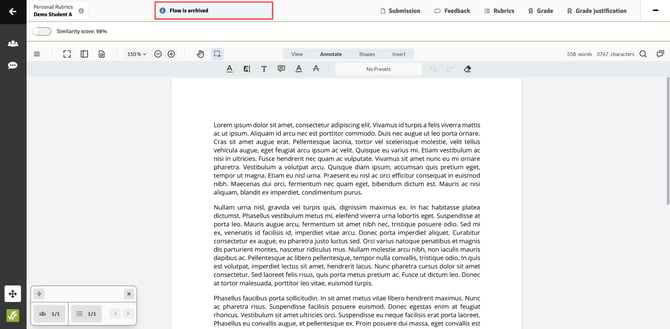
Archived flows are identified. You can find out more here.
Right-hand Navigation Pane
Submission Overview
.jpg?width=352&height=240&name=Marking%20Tool%20-%20Submission%20Pane%20(FLOWassign).jpg)
- Open the submission overview
- Close the submission overview
- Build a package for export that can be downloaded and marked outside of WISEflow
- Identifies the main PDF submission (FLOWassign)
- List of appendices, if applicable (FLOWassign)
When a submission contains more than one file, the submission overview opens for the assessor automatically.
Rubrics

- Open the rubric
- Close the rubric
- Select with whom the rubric should be shared
- The rubric to be completed
- Progress of the rubric completion
- Calculated score (standard rubric)
- Once complete, approve the rubric
If a flow has been set to marker agreement AND the assessor type includes being able to view co-assessor(s) grades, the view will be be slightly different and you can read more about it here.
Submission Feedback
Submission feedback can be added by opening the submission feedback window by clicking on the ![]() icon. Please see our article on providing feedback
icon. Please see our article on providing feedback
If a flow has been set to marker agreement AND the assessor type includes being able to view co-assessor(s) grades, the view will be be slightly different and you can read more about it here.
Grade

- Open the grading window
- Preliminary grade according to the completed rubric (definitive if the grade scaler is enforced) or final grade if submitted and finalised (denoted by a locked padlock icon)
- Close the grading window
- Submit the completed assessment for the submission: a pop-up window asks for confirmation that the grade is correct and allows the assessor to add an internal note to the grade audit trail
- Grade that has been entered (either manually, calculated through completion of the rubric or automatically if the mark converter is enforced)
- Submit an alternative grade for the participant if you have been given the privilege to do so
- View the complete audit trail for the participant, including that of your co-assessors if you have the View submitted grades from co-assessors privilege on your assessor type.
- Early release of feedback for that participant only (if the appropriate setting has been enabled on the flow), allows feedback to be available to the participant prior to the end of marking period
- View the grade scaler if one has been added
- View the completed rubric for the submission (if a rubric is present on the flow)
- Feedback table detailing the numbers of annotations, submission feedback items and common feedback items followed by the number of each of those items that will be shared with participants
- Score as calculated/entered through completion of the rubric
If a flow has been set to marker agreement AND the assessor type includes being able to view co-assessor(s) grades, the view will be be slightly different and you can read more about it here.
FLOWmulti
Submissions made to a FLOWmulti will be presented in the marking tool as shown below where you will immediately be presented with the first item of the assignment (including auto-scored items) or the first item to which you have been allocated (item-based marking).
.jpg?width=670&height=330&name=Marking%20Tool%20Main%20Page%20(FLOWmulti).jpg)
With multiple functions available, we shall take each section of the tool in turn. Please note that the screen views may differ according to how flows have been set up.
Left-hand Navigation Pane
Participants
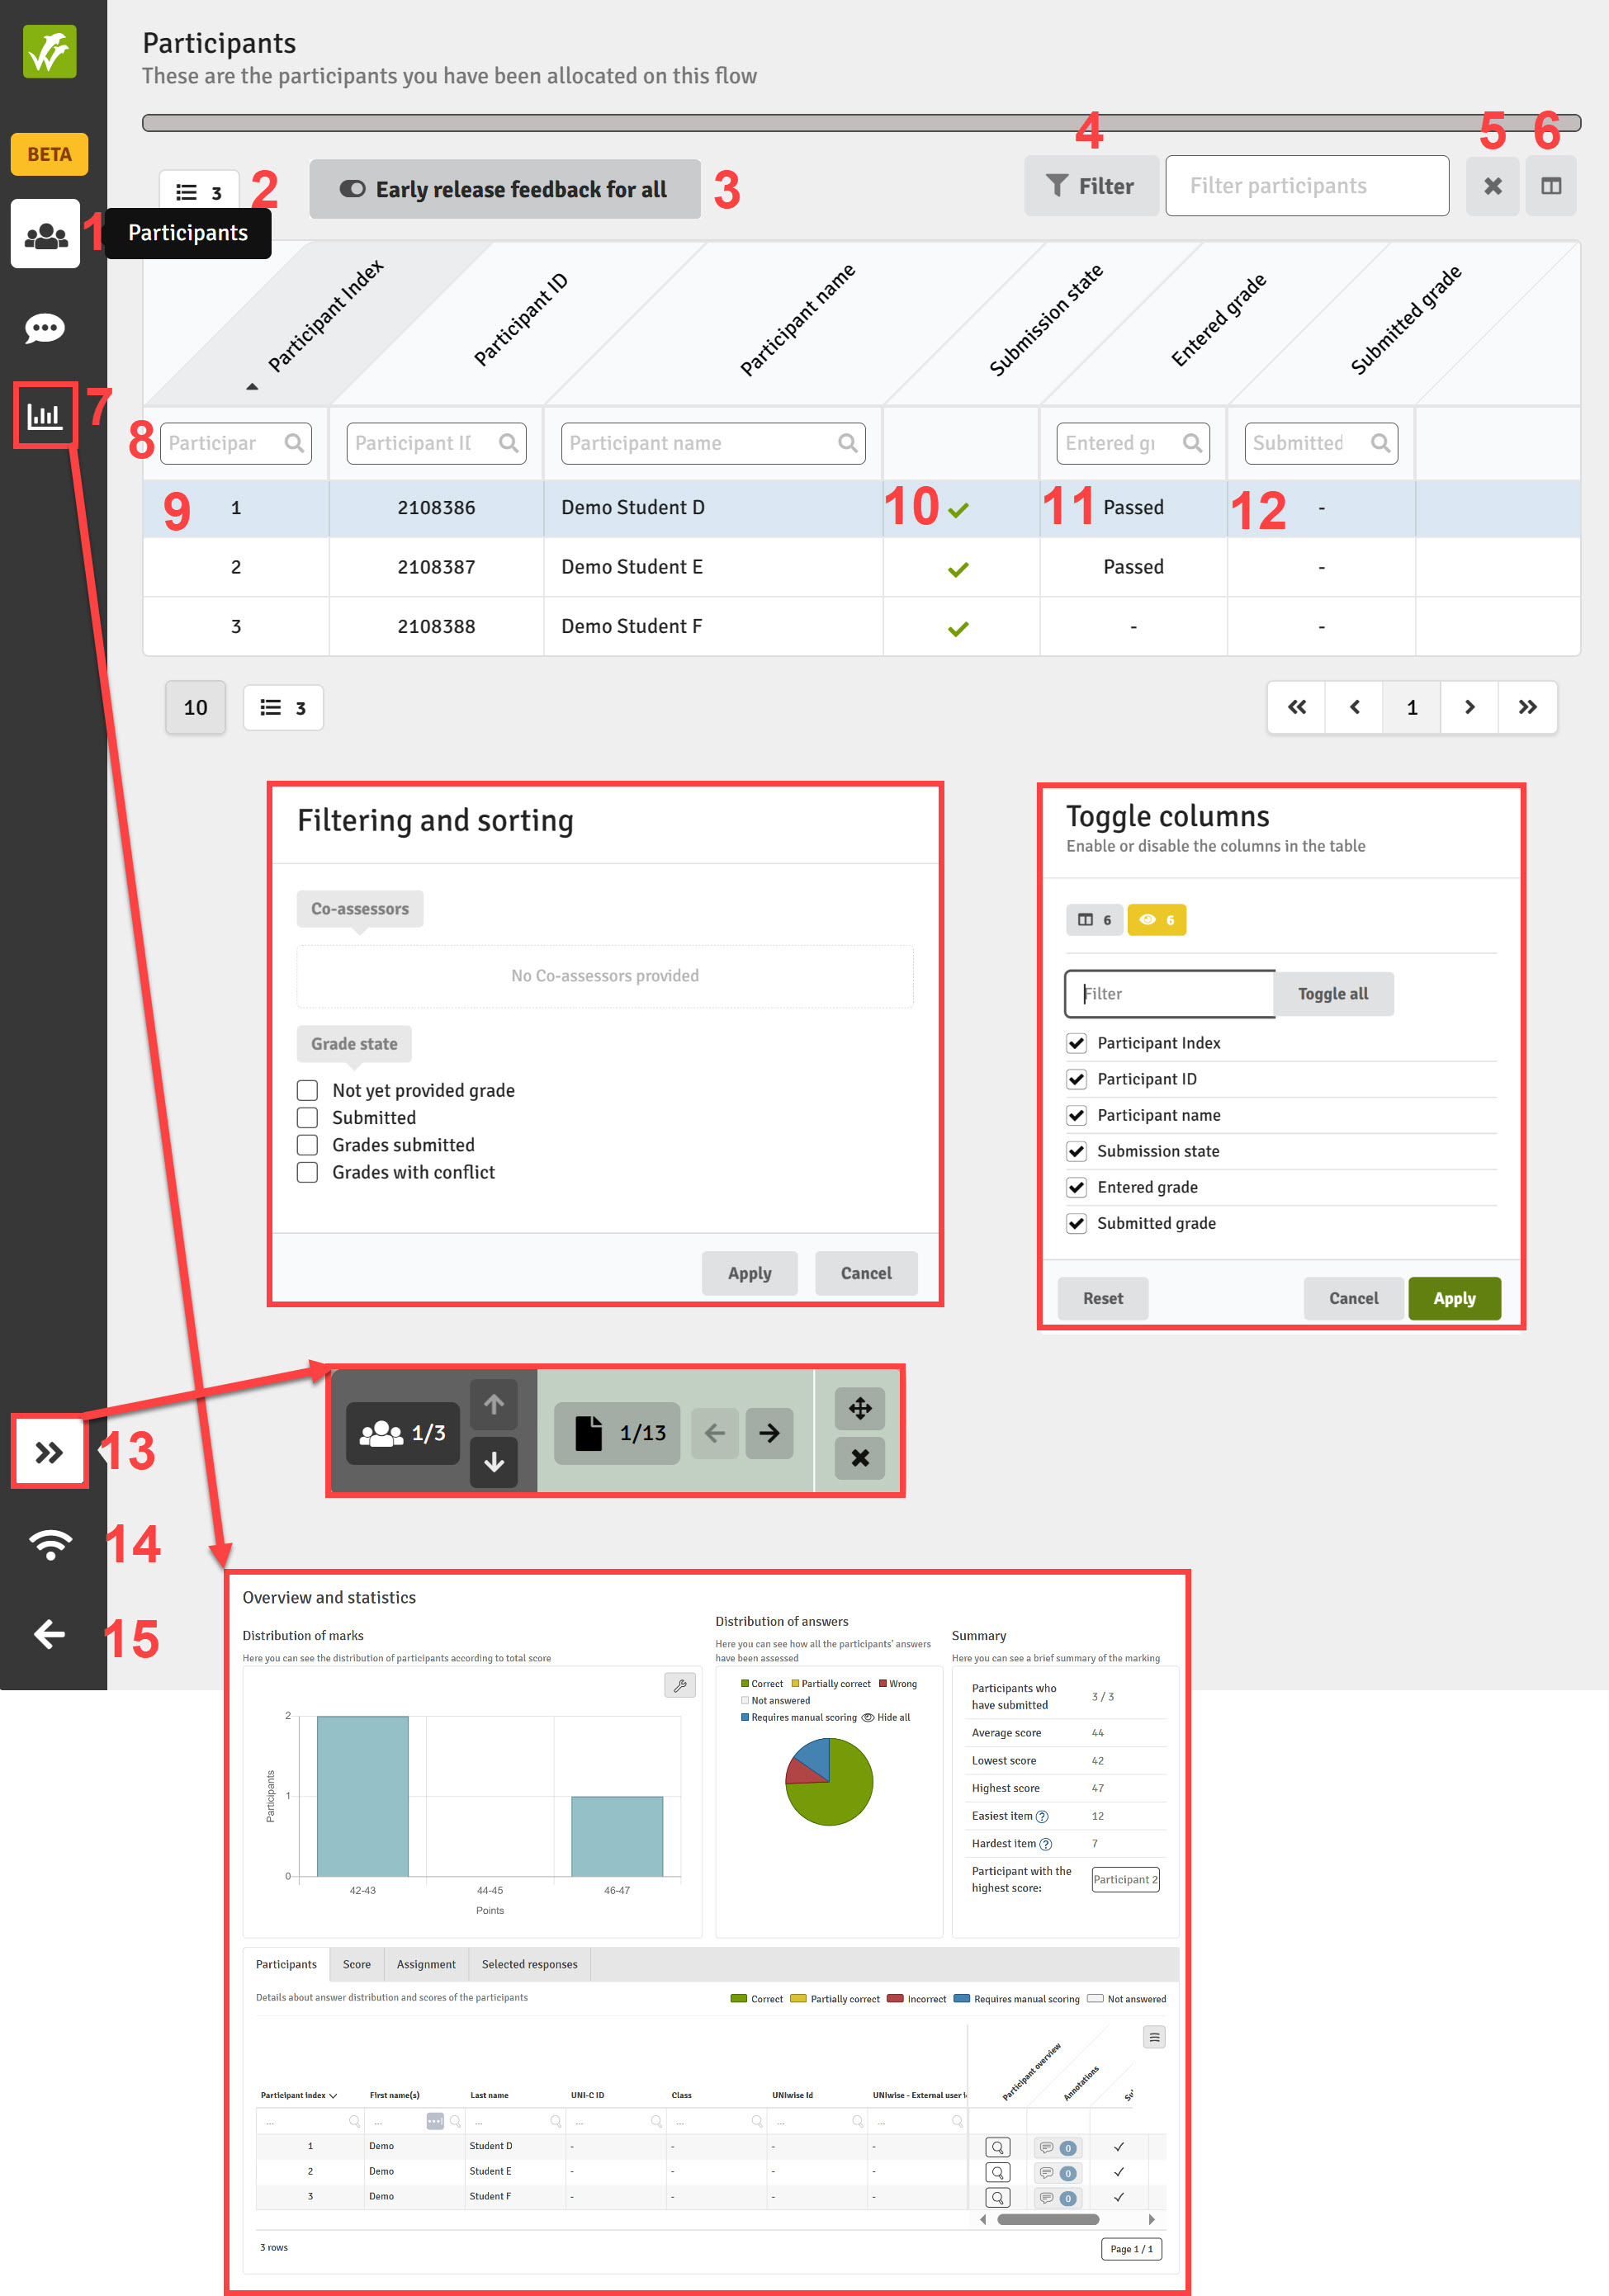
- Open the list of participants
- Number of participants listed
- Apply Early release feedback for all to all participants (this setting can be enabled/disabled individually within the grading window)
- Filter the list of participants by selecting a criteria from the pop-up window
- Remove the filter
- Select the columns you wish to be visible in the table of participants
- Open the statistics module
- Filter the list using any of the column headers
- Go to a participant's submission by clicking on the row in the table
- Identifies participants that have made a submission
- Identifies participants for whom you have entered a grade but yet submitted a final grade
- Identifies participants for whom a final grade has been submitted
- Opens the navigation bar allowing you to move up and down between participants or left and right between items answered by the same participant
- Confirms your network status e.g. online
- Takes you back out of the marking tool
Common Feedback
Common feedback can be added by opening the common feedback window by clicking on the ![]() icon. Please see our article on providing feedback
icon. Please see our article on providing feedback
Main Navigation Pane
Item View

- Flow name and current participant name (when not anonymised)
- View: view the items as they were submitted (interactive files such MP4s can be accessed from here)
- Annotate: access the annotations functionalities and create inline annotations against any part of the submission which in this view is essentially a PDF (interactive files such MP4s cannot be accessed from here); find out more detail on creating annotations
- Access statistics for the question
- Displays present overall score for the participant
- Displays current score of the item
- Move the navigation bar to your desired location on the screen
- Close the navigation bar
- Identifies which participant you are viewing by the index number
- Navigate up and down through the list of participants
- Identifies the item number you are viewing
- Navigate left and right through the items answered by the current participant
Right-hand Navigation Pane
Submission
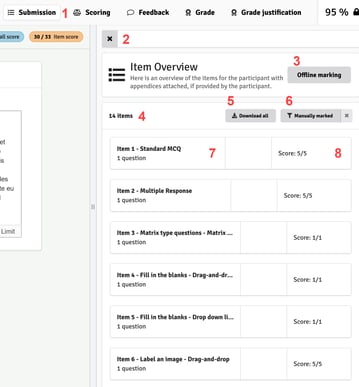
- Open the submission window to view all items allocated to you as the assessor
- Close the submission window
- Access the offline marking functionality
- Displays the number of items in the list
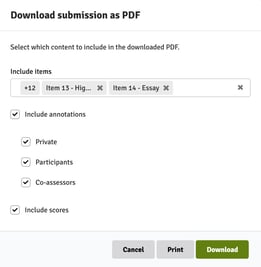
- Download the full submission as one PDF- you can select which items to include, which annotations to include according to their sharing state and whether to include the scores:
- Filter the list of items to only those that require manual marking i.e. filter out those that are auto-scored
- Click on the item row to open that item
- Click on the item's score to open the scoring window for that item
Scoring

- Open the scoring window
- Close the scoring window
- Item number/title
- Switch to modify auto-scores: only available to assessors that have been allocated an assessor type that includes the Modify auto-scores on FLOWmulti privilege (scores must be within the set minimum and maximum scores)

- Question number/title
- Identifies auto-scored items
- Displays current score and maximum score of the item
- Open the full list of the items and navigate between them
- Move to the next item for the same participant
- Confirms the score for the item
Assessors can update the score of auto-scored items, if they have been given the appropriate privilege via the assessor type: Modify auto-scores on FLOWmulti. Modified scores must be within the defined minimum and maximum score of the item.
Even if a flow has been set to marker agreement and the assessor type includes being able to view co-assessor(s) grades, it is NOT possible to view the manually entered scores from a co-assessor. You can read more about this here.
It is possible to leave a question without a score in FLOWmulti. This allows for a 'null' score to be recorded in the system as opposed to a zero (0). Simply leave the question unmarked if you wish a null score to be recorded.
Submission Feedback
Submission feedback can be added by opening the submission feedback window by clicking on theIf a flow has been set to marker agreement AND the assessor type includes being able to view co-assessor(s) grades, the view will be be slightly different and you can read more about it here.
Rubrics

- Open the rubric
- Close the rubric
- Select with whom the rubric should be shared
- The rubric to be completed
- Calculated score based on the completed rubric
- Suggested grade based in the grade scaler
- View the grade scaler
- Select the final grade (this is not possible if the grade scaler is enforced)
- Enter the rubric grade
If a flow has been set to marker agreement AND the assessor type includes being able to view co-assessor(s) grades, the view will be be slightly different and you can read more about it here.
Grading

- Open the grading window
- Preliminary grade according to the completed rubric (definitive if the grade scaler is enforced)
- Close the grading window
- Feedback table detailing the numbers of annotations, submission feedback items and common feedback items followed by the number of each of those items that will be shared with participants
- Score as calculated/entered by marking/auto-scoring of the assignment items and/or a rubric (if applicable) [NOTE: rubrics are rarely used for marking FLOWmulti assignments
- View the grade scaler if one has been added
- View the completed rubric for the submission (if a rubric is present on the flow)
- Grade that has been entered (either manually, calculated through completion of the rubric or automatically if the mark converter is enforced)
- View the grade audit trail for the participant, e.g. previously submitted and subsequently unlocked final grade
- Early release of feedback for that participant only (if the appropriate setting has been enabled on the flow), allows feedback to be available to the participant prior to the end of marking period
- Submit the completed assessment for the submission: a pop-up window asks for confirmation that the grade is correct and allows the assessor to add an internal note to the grade audit trail
If a flow has been set to marker agreement AND the assessor type includes being able to view co-assessor(s) grades, the view will be be slightly different and you can read more about it here.
FLOWattend/FLOWoral
As the marking tool for FLOWattend works in the same way for FLOWoral, details below regarding the marking tool will be the same for both flows.
Flow Page Overview for FLOWoral
FLOWoral is designed to support scheduled assessment activities where the assessor interacts with the candidate or observes them completing an activity or performing a particular skill. As such, candidates are not required to submit artefacts to WISEflow, rather they are scored based on the assessor's live observation. It also means that the scoring usually takes place in a real-time context as the assessor observes the candidate completing their assessment. To support this format the WISEflow interface differs from some of the other flow types.
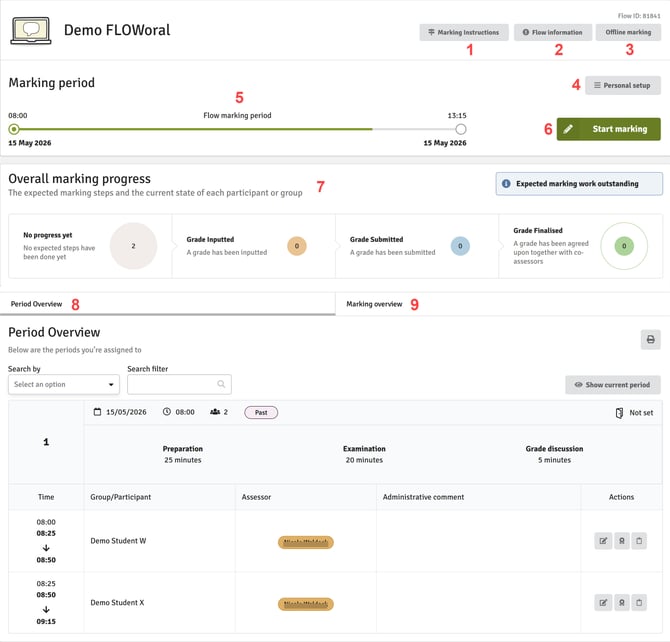
- Access the marking instructions provided by the manager
- Access information collated about the flow
- Access the offline marking functionality
- Access your personal setup where you can add your own rubrics (if not already added on the flow by a manager) and a grading scale (from rubrics)
- Displays the flow marking period timeline
- Open the marking tool (access scoring and grading tools) with Start marking; once marking has started, this will become Resume marking where you will be taken to where you left off; you will be able to commence marking as soon as the flow has been activated
- The dashboard is a visualisation of the marking progress for the assessor
- Period overview (details the candidates to which you have been assigned as an assessor and in which order they are due to appear); you can search and filter by participants/groups, assessors or rooms, toggle between the current exam period or showing all periods, and print the exam period summary.
The different times indicate the start time for preparation, the start time of the oral examination and the end time of the examination. If time has been allocated for the discussion of the grade, this will be reflected in the end time for an individual participant. - Marking overview (where final grades will eventually be submitted)
The Marking Tool
Although no submission will be present, the marking tool itself works in a very similar way and many of the same tools for marking and feedback are provided.
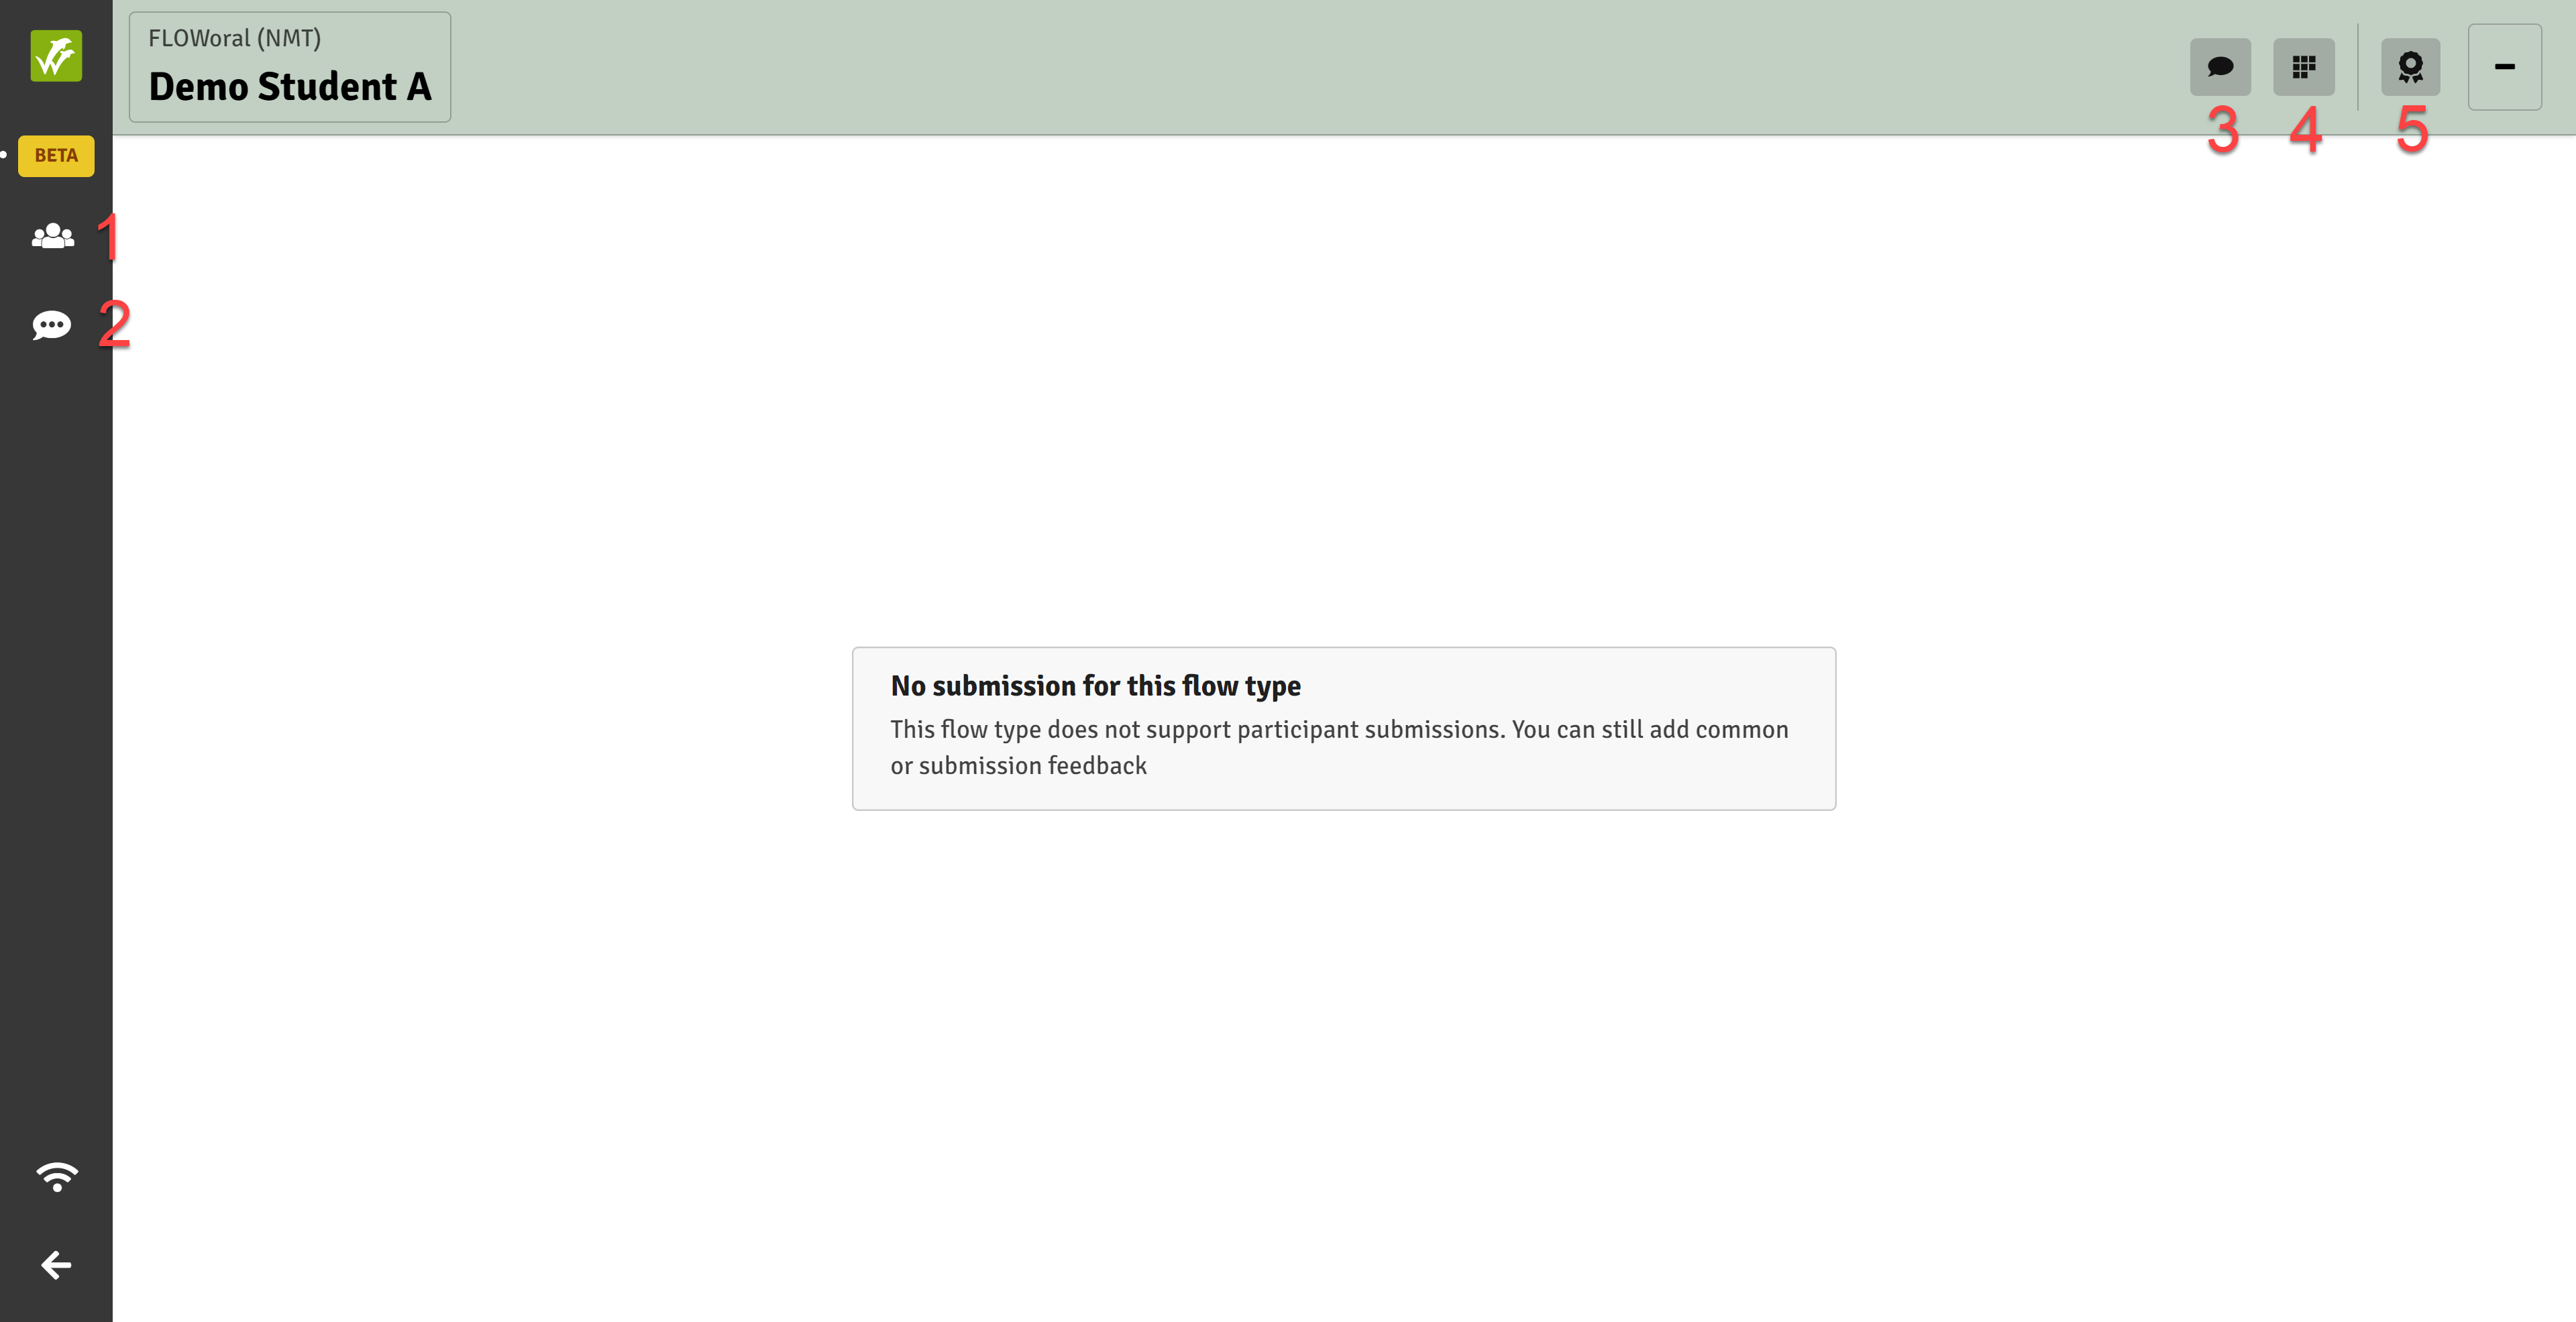
- List of participants: navigate through the cohort
-
Common feedback: provide feedback on the participants to whom you have been allocated
- Submission feedback: provide feedback on an individual's submission
- Rubrics: access and complete any attached rubrics
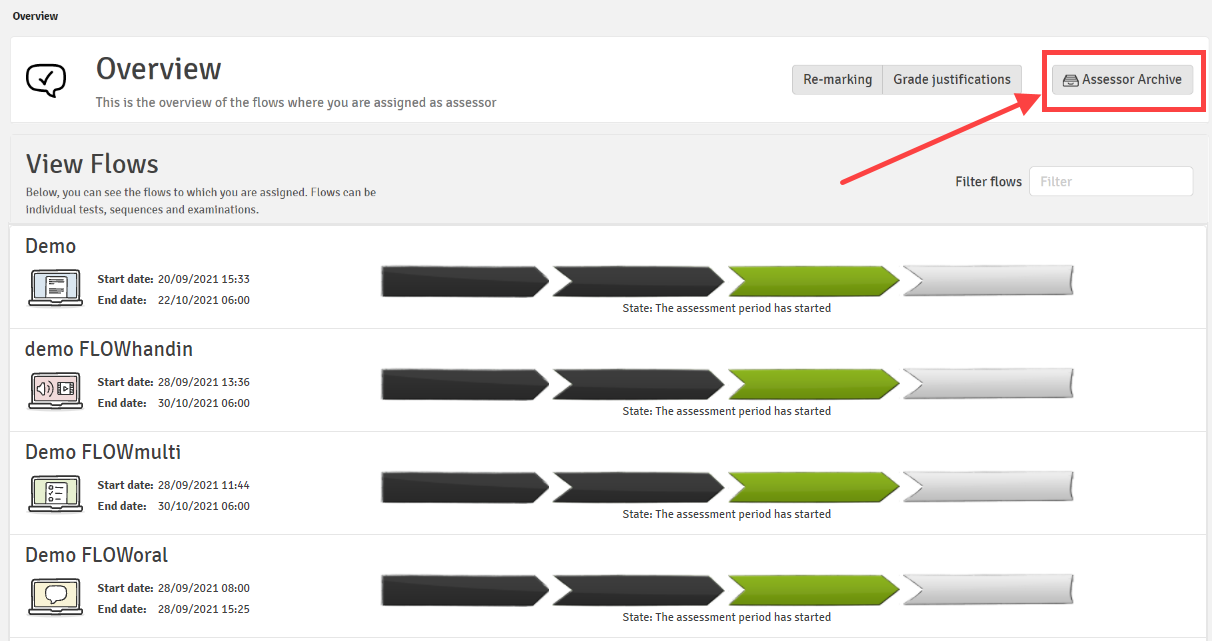
Flows are archived by default one month after the end of the assessment period (this may vary if your institution has set up different retention rules). You can find archived flows in the marking archive, available from the marking landing page.