
This article has been updated to reflect the enhancements that will be available after Friday 12 June as part of the June 2026 Release.
In this article:
- Managing Participation and Marking Periods
- Manage Dates (for FLOWassign, FLOWhandin, FLOWlock, FLOWmulti)
- Time Planning in FLOWoral
Managing Participation and Marking Periods
FLOWassign, FLOWhandin, FLOWlock and FLOWmulti operate on participation and marking periods that are set via the Deadlines pane on the flow page. When a flow is created, the system automatically sets the date for the participation period for the following day. The dates can be changed on a new subpage by clicking on the icon Manage dates.
Manage Dates
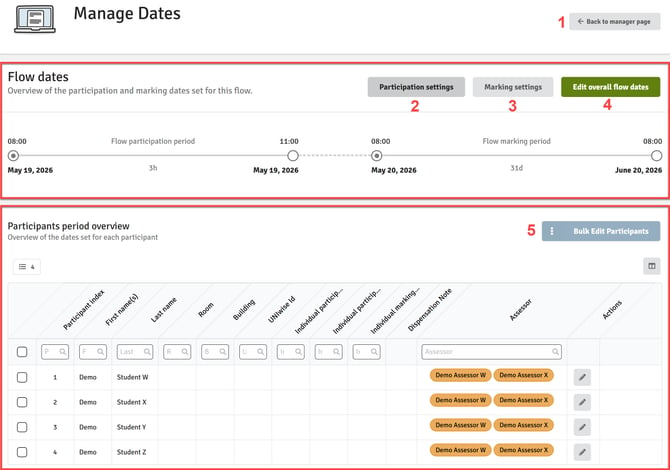
- This brings you back to the flow overview page
- View and change the participation settings (Timebox and Late Submission), see below
- View and change the marking settings (No Withdrawal of Submission, Early Marking Access and Set Individual Marking Period) and general participation and marking dates for all candidates
- View and change the dates for individual participants. Filter the table using the appropriate column to find the desired participants, including room and building.
If a flow is set up to handle group submissions, you can decide whether the overview should show individual participants or groups. When groups have started to be formed, the default will show groups. If not all participants have been allocated to to groups, switch to the individual view to edit all participant dates.
Participation Settings
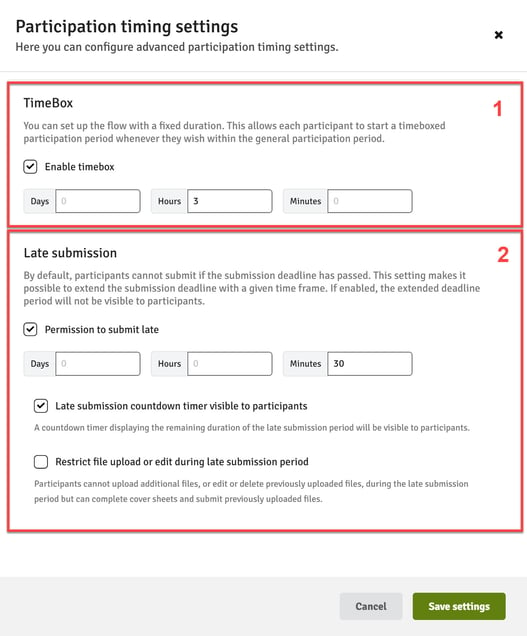
- Time Box: You can set up a flow with a fixed duration. This allows each participant to start a timeboxed participation period whenever they wish within the general participation period. For example, a time box could be set for a 3 hour exam to be completed any time within a general participation period of 24 hours.
- Late Submission: This setting makes it possible for participants to submit beyond the end of the general participation period. It can help support students who have a tendency to submit very close to the deadline and can sometimes be affected by slow upload and submission speeds causing the deadline to be missed. The default of this setting alone is that this extra time is not visible to participants (see below).
- Late submission countdown visible to participants: enable this setting if you wish participants to see the additional late submission time available to them.
- Restrict file upload or edit during late submission period: participants cannot upload additional files, or edit or delete previously uploaded files during the late submission period. They can complete their coversheet and submit previously uploaded files.
Marking Settings
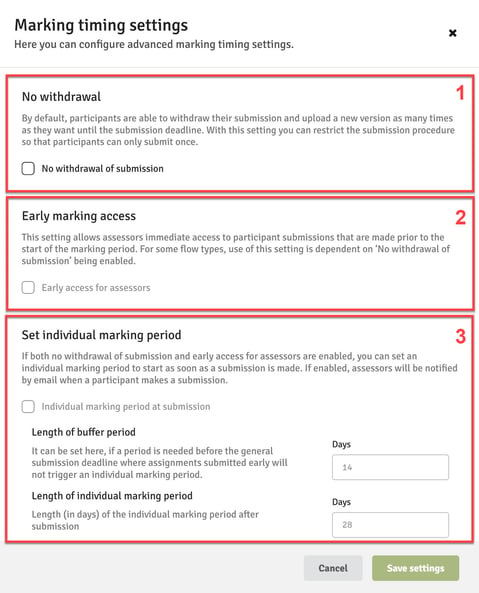
- No withdrawal: By default, participants can submit as many times as they like before the end of the participation period. Enabling this setting prevents this meaning participants can only submit once. This then allows for the Early marking access setting to be enabled (see below).
- Early marking access: This setting allows assessors access to submissions as soon as they are made. For some flow types, use of this setting is dependent upon the No withdrawal setting being enabled (see above).
- Set individual marking period: If both of the above settings are enabled it is possible to set an individual marking period to start as soon as a submission is made.
Flow Dates
The participation and marking start and end dates are shown here. If deadlines have been changed for individual participants, this will be displayed here as well. By clicking on Edit overall flow dates, you can change the start and end times for all participants.
If you change the start date of the participation period and the new dates overlap with the participation end date—meaning the start date is set after the original end date—the overall duration of the participation period will remain the same.
For instance, if the participation period is originally set from 28 June at 09:00 to 28 June at 12:00, providing a duration of 3 hours, and the start time is moved to 28 June at 13:00, WISEflow will automatically retain the 3-hour duration for the participation period.
The same logic applies to the marking period.

- The dates and times for the participation and marking period can be changed either by clicking on the calendar symbol or clicking directly on the dates and times and overwriting them. It will not be possible to change the start date for the participation when the flow has started.
- Indicates the total duration of the participation or marking period.
- Any changes made to the flow dates need to be saved manually.
Participants Period Overview
When a flow has started, it is possible to change the participation period or marking deadline for individual participants on the participants period overview. The overview table shows if dates have been changed for individual participants.

- Change the start or end participation date/time or the marking deadline for several participants. Select several or all participants, click on Bulk Edit Participants and select what dates you would like to change.

Add dates by clicking on dd/mm/yyyy or using the calendar symbol. Any changes made need to be saved by clicking on Set deadlines. It is possible to Reset all changes to revert back to the general flow dates.
- Add or hide columns for the participant table overview.
- Choose all or select several participants to bulk edit their participation periods or marking deadlines (see point 1 for more information).
- When changing the dates or times for individual participants, it is possible to leave a note explaining the changes. This will only be visible to managers on the flow.
- Edit the participation period or marking deadline for an individual participant by clicking on the dates or the calendar symbol. Any dates changes will be indicated and need to be saved manually by clicking on Set deadlines. It is possible to reset all changes so that the dates for the participant will revert back to the general flow dates.

It is also possible to reach the above screen for an individual participant directly from the Participants segment of the Basic Settings sub-tab. Click on the the individual start date, individual end date or individual marking deadline against the desired participant. For example: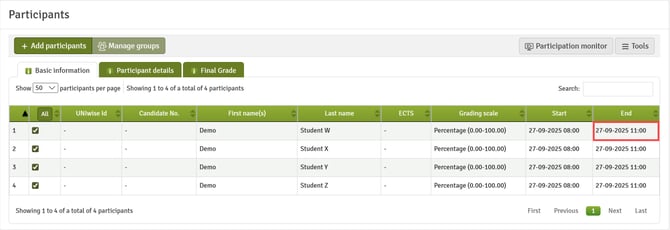
If flows are set up with an individually timed flow duration, participants only have a fixed timeframe (i.e. 2 hours) within the general participation period (i.e. 3 days) to start the flow and hand in their submission.
Changing group dates will override all individual participant dates and notes.
Time Planning in FLOWoral
Time planning in FLOWoral makes it possible to create a detailed time plan for the oral examination. It is possible to make a plan for preparation, examination, discussion of the assessment and, optionally, breaks. You can determine if and when an assignment should be distributed and if assessors should have the option to edit the exam periods.
To manage and define the examination periods in a FLOWoral, click on Manage periods which will bring you to a subpage.
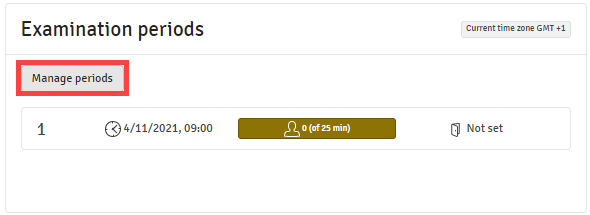
FLOWoral Overview

- You can set up default slots for different examination periods and breaks.
- Return to the main flow page.
- If administrative comments have been added to participants, you can decide to include them in the overview.
- Print out the finalised examination overview. Note that comments will also be printed if Include comments is selected.
- Manage the different exam periods of the flow.
- Overview of your exam periods, indicating the day and time, how many participants are in one exam period (
 ), the room (
 ) as well as the names of the participants and, if included, any comments.
Manage Periods
Define each period of the examination and also distribute the participants between them.

- Reset your distribution which will place all participants in the left menu.
- All participants will be distributed equally between the exam period(s).
- Sort all exam periods by date.
- Add a new period. Define the start date and time by clicking on the calendar icon and define the time for preparation, examination and discussion of the the grade in minutes.

- Lock the setup if you do not want to make any more changes. Locking the setup can also be useful if you want to add participants or groups to default slots that have been added as placeholders (see Set Default Slots below for more information).
- You can find individual participants by typing in their names in the search field. Press Enter to select the highlighted item.
- If Display assessors is selected, you can find assessors by typing in their names in the search field or selecting a marker from the list. Markers are displayed with their initials and internal and external markers are marked in different colours.

- Unassigned participants/groups are listed on the left. The participants can be sorted alphabetically by first or last name or by a secondary ID (e.g. student number). They can be distributed manually by dragging them to the appropriate slot in the exam period. If default slots have been set up, they can be found here as well and used as placeholders until they can be replaced with participants.

- Exam Period Overview:
 You can edit the exam period, add a break or, if no participants have been assigned, delete the period
 If participants have been added, you can edit their individual preparation, examination or discussion time or add a comment which can be shared with the participant. Click
  if you want to reset an individually added time back to the default of the exam period.
You can also remove single participants or convert their spot in the exam period to a placeholder. This will send them back to the list of unassigned participants.
- Save your set up when you are finished.
Set Default Slots
You can build and maintain flows independently with sets of default slots and breaks containing the needed pre-set time ranges. This may help you better in planning ahead of time, while the result of participants etc. have not been finally set. You can for instance create a two-person group default slot and set it up to have 20 minutes of preparation, 40 minutes of examination, 10 minutes for voting and set up a standard lunch break to last for 45 minutes.
Please note that these default slots/breaks are for your individual use only and cannot be seen by other managers. Slots/breaks placed in the actual exam period can be seen by all.
Click on Manage Periods on the examination periods pane under Basic flow settings and then Go to default flow setting page.

From there you can set up the default slots for examinations and default breaks that you may want to have when you are building FLOWorals.
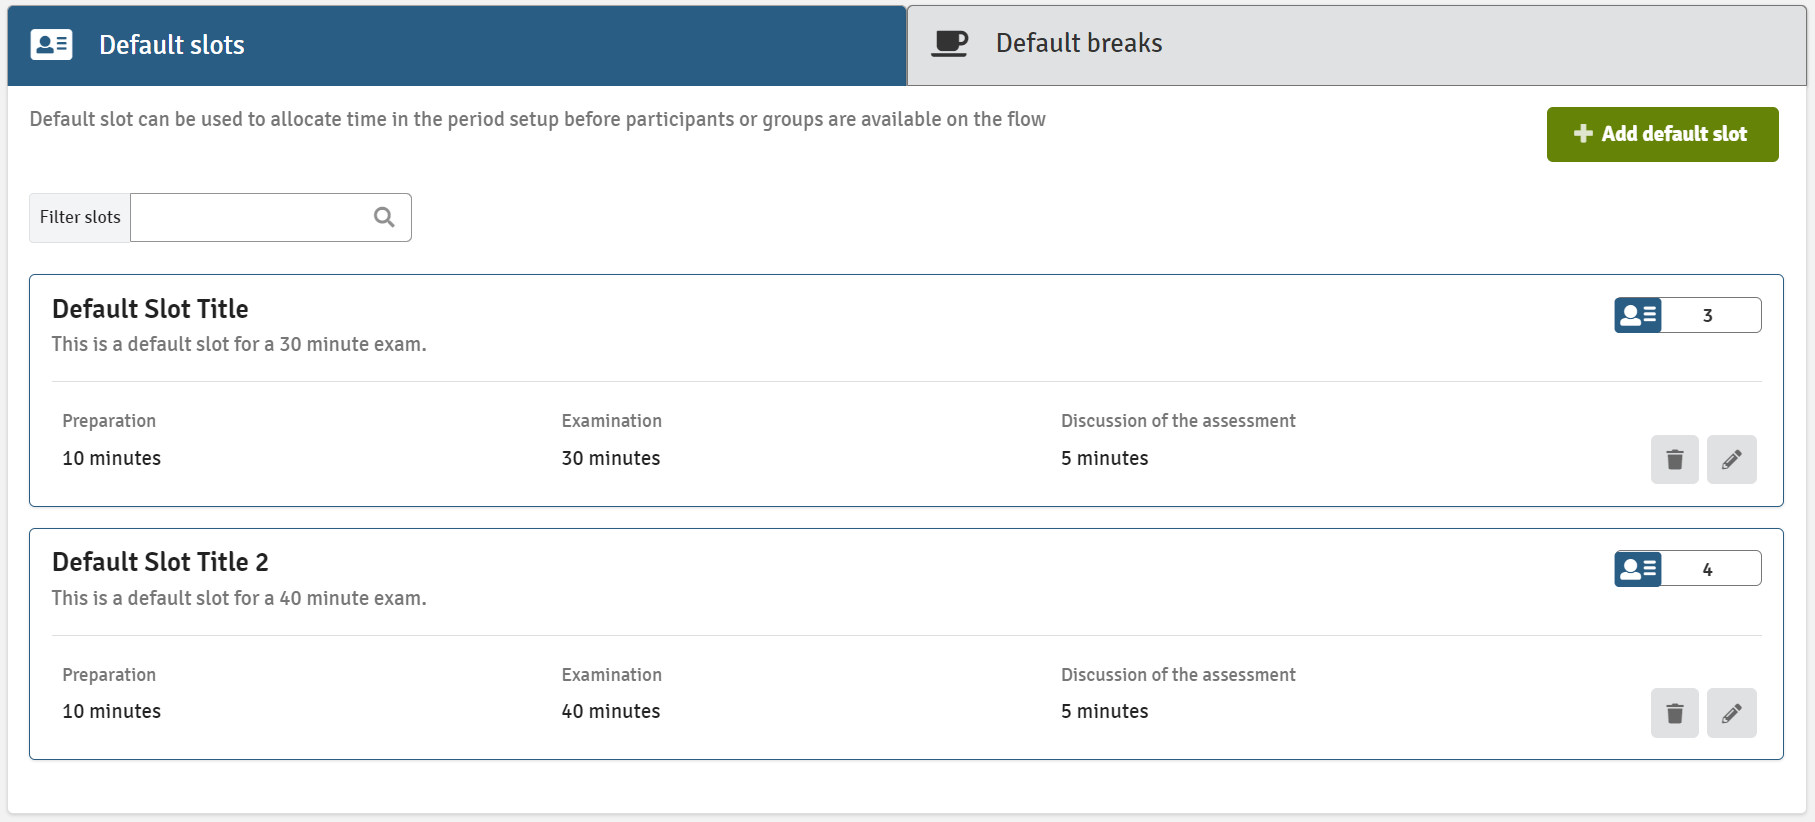
Default Slots

By clicking Add default slot, you can set up as many default slots as you want. The title, the number of participants as well as the time for preparation, examination and discussion of assessment (in minutes) are required fields. If, for example, there should be no time allocated for the discussion of the assessment, enter 0 minutes. You can optionally include a description for the slot.
When you have set up your default slot, it will show up in the overview. If you have several default slots, you can use the search field in the left-hand corner to filter your slots to only show a specific one.
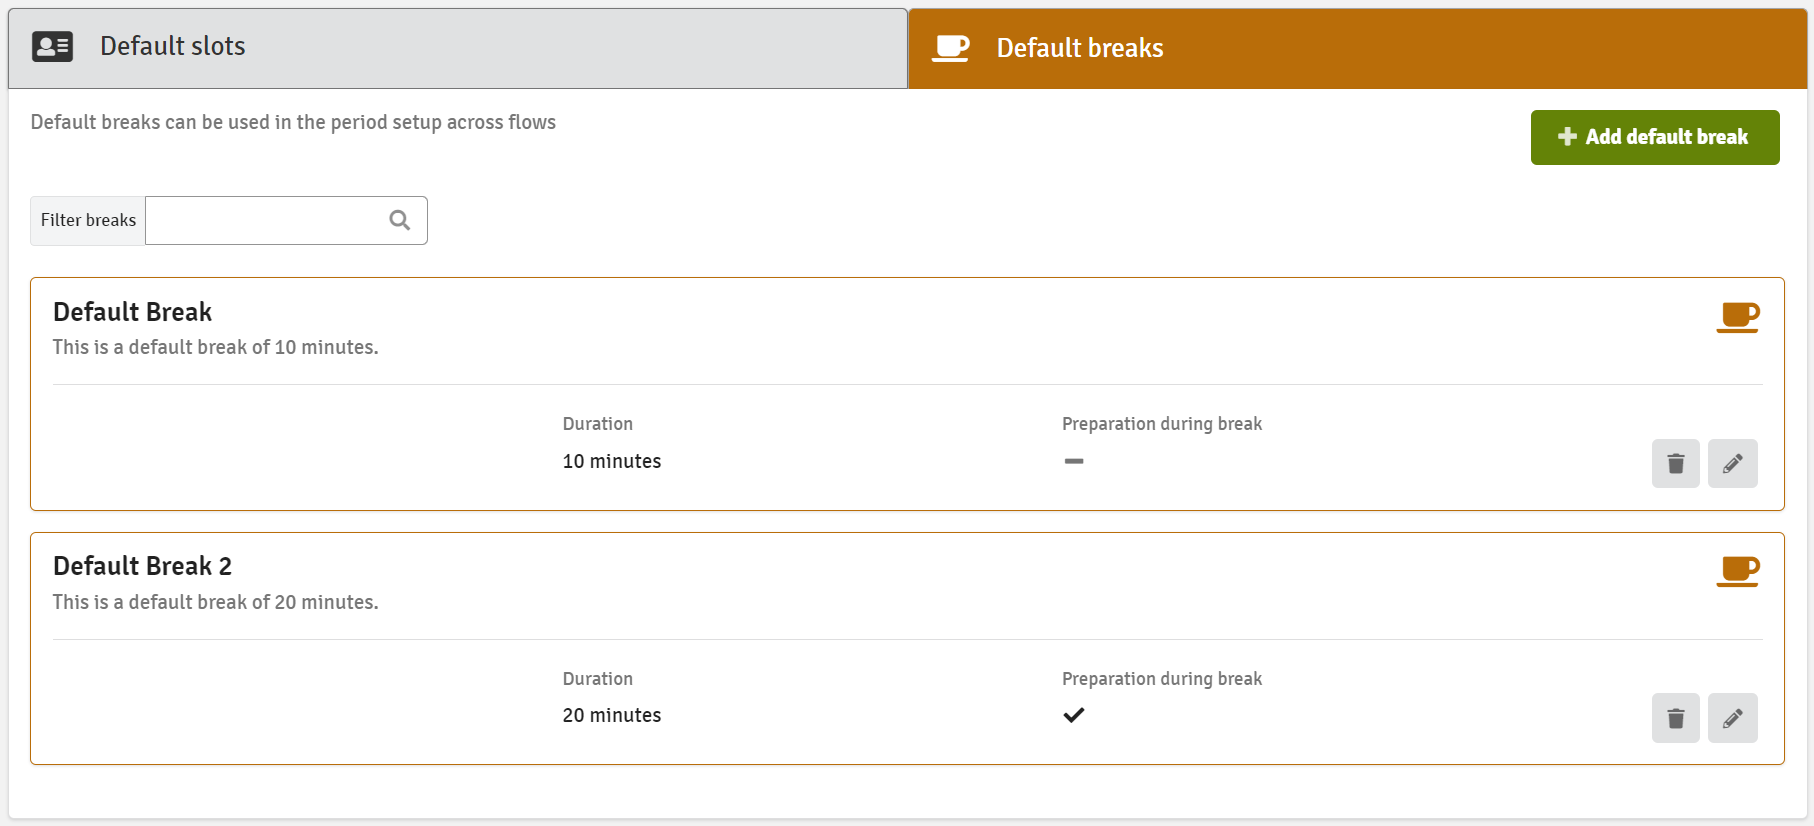
Default Breaks

By clicking Add default break, you can set up as many default breaks as you want. The title and duration of the break are required fields, you can optionally add a description and enable that preparation can take place during the break.
When you have set up your default break, it will show up in the overview. If you have several default breaks, you can use the search field in the left-hand corner to filter your breaks to only show a specific one.
When setting up timetables you can add default slots as placeholders instead of adding participants/groups directly. When the participants are enrolled and the groups are formed, you can then drag them into the placeholder when the setup has been locked.